(DIRECT-READING MONITOR)
| Method Number: | ID-209 | |||
| Matrix: | Air | |||
| OSHA Permissible Exposure Limits
(PEL) Final Rule*: |
35 ppm Time Weighted Average (TWA) 200 ppm Ceiling (5-min sample) 1,500 ppm Instantaneous* | |||
| Transitional*: | 50 ppm TWA | |||
| Monitoring Device: | Workplace areas are monitored using a
| |||
| Recommended Sampling Times: TWA Determination: Ceiling Determination: |
8 h 5 min | |||
| Analytical Procedure: | Direct-reading instrument - Datalogger. Data are transferred to a computer, exposures are calculated, and results are stored and/or sent to a printer for a hard copy. | |||
| Detection Limits (Instrument TWA read-out - also see Section 1.5.2.) | ||||
| Qualitative: Quantitative: |
1.2 ppm 4.1 ppm | |||
| Precision and Accuracy |
| |||
| CV2 (Pooled): |
| |||
| Bias: |
| |||
| Overall Error: |
| |||
| Validation Ranges: |
| |||
| Special Requirements: | IBM-compatible computer | |||
| Method Classification: | Validated method (Direct Reading Instrument) | |||
| Chemist: | Robert G. Adler | |||
| Date: | March, 1993 | |||
* This method was evaluated using the Final Rule Limits stated above; the Transitional Limit of 50 ppm is within tested ranges and the method should perform well when assessing compliance at this concentration. Compliance with the 1,500 ppm Instantaneous Exposure Limit (same as the Immediately Dangerous to Life and Health (IDLH)] cannot be assessed using the specific equipment described in this method. Please consult The OSHA Chemical Information File and Section 2. of this method regarding instantaneous carbon monoxide exposure determinations.
Commercial manufacturers and products mentioned in this method are for descriptive use only and do not constitute endorsements by USDOL-OSHA. Although the following Instrument Description, Backup Data, and Auxiliary Sampling (Appendix B) Sections of this report describe use of a specific carbon monoxide monitor, similar monitors can be substituted provided they meet validation requirements.
OSHA Salt Lake Technical Center
Salt Lake City, Utah
1. Introduction
- When the sensor is in operation, measured values are sent to
the microprocessor twice each second. The values (120 sequential
readings) are then computed into a
1-min average and this value is stored in memory. When data are transferred to a printer, the1-min averages can be listed and/or graphically plotted. The sensor has a response time of approximately 1 min for large changes in concentration. - The
1-min averages are truncated to integer ppm CO values (i.e., for 6.9 ppm CO the Datalogger would give a value of 6 ppm). The TWA value reported by the instrument is the average of all truncated1-min averages, and is also truncated to an integer ppm value. The truncated values will always be < thehand-calculated values.
Note: Hand-calculated averages were also obtained during this study; in these cases, all truncated1-min averages were manually averaged and rounded to the nearest 0.1 ppm value.
- The instrument also notes the highest
1-min average over the sampling period, and reports this value as the peak concentration. The specific time that this peak occurs is indicated either graphically or in a sampling summary. Where duplicate highest1-min averages occur, only the first occurrence is listed. Monitoring for the OSHA Ceiling PEL of 200 ppm CO requires the user to perform ahand-calculated average of1-min readings over a5-min sampling period. The peak concentration function of the Datalogger cannot be used in this instance because it reports out only the highest1-min reading. - According to the manufacturer, the instrument is specific for CO when the Datalogger is equipped with a CO-specific filter (P/N 4510184). Interferences besides those mentioned by the manufacturer were discovered during the evaluation. See Section 1.6. for further details.
- The monitor is equipped with an audible alarm for immediate warning of dangerous CO levels.
- The monitor can be used to measure compliance with Indoor Air Quality (IAQ) Standards for CO [9 ppm (8 h), 35 ppm (1 h)] (5.14.).
- The monitor is easy to set up and use and has a rapid response time (~1 min).
- Data can be retrieved at the convenience of the industrial hygienist.
- The monitor normally will not interfere with the worker's activities and is intrinsically safe if not altered.
- Changes in humidity do not affect sample data collection.
- The monitors permit measurement of the fluctuations in the CO concentration throughout the sampling period. Classical sample collection techniques will give only a TWA concentration unless multiple samples are taken.
- The TWA concentration for the sampling period is calculated by
the monitor. Peak concentrations are also indicated; however, a
5-min hand-calculated average is necessary when comparing output to the OSHA Ceiling PEL for CO. - Sample storage stability problems are not encountered.
- Without a CO-specific filter, significant interferences can be encountered from ethylene, acetylene, hydrogen, hydrogen sulfide, nitrogen dioxide, nitric oxide, and sulfur dioxide. See Section 1.6. for other interferences.
- For the initial purchase, the monitors are relatively expensive.
- Additional equipment is needed for calibration. For accurate calibration, the calibration gas flow must be maintained at the manufacturer's recommended rate (0.20 L/min). For OSHA compliance, monitors are calibrated each time they are used.
- Recovery of the data requires transferring to a computer or printer; sample results can be easily lost if the transfer is performed incorrectly. Data can also be lost if battery voltage drops significantly before the data can be transferred. A 9-volt battery is used to operate the instrument.
- Samples taken in areas of high air velocities directed toward the sensor may result in a positive bias to the CO concentrations read.
- Because the instrument automatically performs integer math for
calculations, truncation error is possible for TWA values reported
by the instrument, especially at single digit levels (i.e., <10
ppm). Optimal performance can be achieved if a
hand-calculated average is obtained for all of the1-min values reported for a sampling period; however, this is a very tedious process and is not recommended for routine applications. The comparability of the precision and accuracy results in this study for the two calculation procedures indicates that, for CO levels near the TWA PEL, the extra calculation work is not necessary. - CO calibration gas
- CO-free nitrogen or CO-free air
- Do not perform calibrations in the presence of an operating radio transmitter. Calibrate the monitors in a clean, well-ventilated environment; if possible, in a well-ventilated exhaust hood. Pre- and post-calibrate the monitors each time measurements are taken.
- In order to eliminate possible effects on calibration due to variations in altitude (pressure difference), calibrate the monitors at the same altitude at which they are to be used. Altitude corrections (calibrating at one altitude and taking measurements at another) were not investigated in this evaluation.
- Calibrate the monitors using the
manufacturer-recommended flow rate of 0.20 L/min. Samples taken in areas of high air velocities (directed toward the monitor sensor) may indicate high CO readings. If necessary, gas bag samples can also be taken and submitted for laboratory analysis [use OSHA Method No. ID-210 (5.12.)]. Air velocity does not have a significant effect on gas bag sample results. - If possible, calibrate the monitors in the field. The effects of vibration during shipping have not been investigated.
- Start the monitor sampling. Record the time at the start of sampling.
- Place the monitor in the breathing zone of the user, preferably secured or attached in a breast pocket. Be sure the sensor is not obstructed.
- Sample for the time indicated:
- TWA Determination: 8 h (if possible)
- Ceiling Determination: 5 min - If datalogging is available
in
5-min increments or less, a full-shift (8 h) sample can be taken and any overexposure to Ceilings can be determined as discussed below (Section 3.2.).
- Terminate sampling.
- Analysis of the sample data from six Dataloggers exposed to
dynamically generated CO atmospheres having concentration ranges of
approximately 0.5, 1, and 2 × TWA PEL.
- Evaluation at levels commonly encountered during IAQ
investigations (approximately 5 and 10 ppm CO).
- Evaluation at levels near the Ceiling PEL (approximately 200 ppm
CO).
- Determination of any variation in results when sampling at low and
high humidity levels.
- Assessment of any significant effect from varying the air flow
rate over the monitor sensor during the evaluation tests.
- Determination of the qualitative and quantitative detection limits
for the analysis of CO.
- Comparison of Datalogger results with a GC method (5.12.)
used for CO determinations in which the CO was analyzed using a
GC-DID.
- Assessment of the performance of this method and conclusions.
- the first
5-min period after the CO concentration readings began to stabilize, and - the entire period from when the CO concentration began to
stabilize to the stopping of the CO flow. Calculated recoveries were
96.1% for the initial
5-min time period and 93.9% for the entire period. As previously stated in Sections 1.3., 1.4., and 3.2., the Datalogger system only gives1-min averages and, therefore,5-min truncated values are not displayed by the Dataloggers. - Two tests were performed to determine linear face velocity effects on Datalogger readings; in one experiment the Dataloggers were calibrated with the gas flow set at 0.60 L/min, and in the other the calibration was conducted with the gas flow set at 0.20 L/min. In each experiment, readings were then taken from the Dataloggers as the rate of flow of the 104-ppm CO through the calibration adapter over the sensors was varied.
- In a test using three monitors, the tubing similar to the calibration device was replaced with a short piece of glass tubing which fit loosely over the monitor sensor cap. Gas flows ranging from 0.20 to 2.50 L/min were permitted to flow over the sensors.
- A test was conducted to determine any effect of varying the nitrogen flow over the sensor after zeroing the monitor. The monitors were zeroed and then the flow rate of pure nitrogen was increased while attached to a Datalogger. Any change from a zero reading in the Datalogger output was noted.
- A test was conducted to evaluate the effect of fast (turbulent) air flow past the Datalogger sensors when the monitors were surrounded by the moving air, rather than being exposed only through the adapter tubing over the sensor (linear flow). Four Dataloggers were exposed in a chamber to air containing 102 ppm CO at 50% RH derived from the generation system. In the chamber, the air was stirred with a fan so that turbulent air at speeds of 15.2 to 91.4 m/min (50 to 300 ft/min) could be swept by the monitors and their sensors.
- a very low sampling rate at low face velocities (<5-10
ft/min),
- a relatively constant ("steady state") sampling rate over a
specific sampling range,
- a higher sampling rate at very large face velocities (>500 ft/min).
- 1.1. History - Monitoring for Carbon Monoxide
The recent change in the OSHA Time Weighted Average (TWA)
Permissible Exposure Limit (PEL) for CO from 50 to 35 ppm (5.1.),
the inclusion of a Ceiling PEL of 200 ppm (5-min sampling period) (5.2.),
and the addition of a maximum Instantaneous limit of 1,500 ppm (5.3.)
stimulated a review of the methods used for the analysis of CO in
workplace atmospheres. This review included both
The previous OSHA sampling and analytical method for CO required
the use of
Recent developments in
1.2. Principle
Samples for monitoring exposures in regards to the TWA and
1.3. Instrument Description and Special Features or Considerations
| (Note: | The Draeger Model 190 Datalogger is discussed below. Other commercially available monitors for CO may have similar characteristics.) |
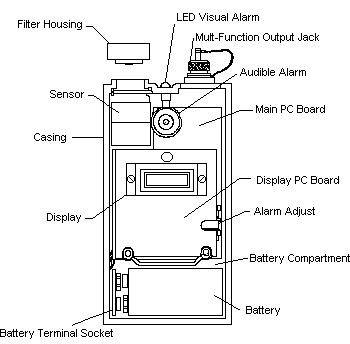
- 1.3.1. The Draeger Model 190 CO Datalogger consists of a
patented 3-electrode diffusional electrochemical sensor with a
removable filter cap, a liquid crystal display (LCD) for providing
1.3.2. A CO-specific filter designed to reduce or eliminate any air contaminants which might interfere with the CO determination is available. This removable filter cap also serves as a dust filter. A plain dust filter can be attached to the sensor if the monitor is used where interfering contaminants are not present.
1.3.3. The operating temperature range is 0 to 40°C. The optimum range in which minimal temperature effect occurs is 10 to 30°C.
1.3.4. Recording of data:
1.3.5. The instrument is not capable of measuring the Instantaneous Exposure Limit of 1,500 ppm due to the instrument range limitation of 0 to 999 ppm CO.
1.3.6. Calibration for routine monitoring should be performed
near the
1.4. Advantages and Disadvantages
- 1.4.1. Advantages
1.4.2. Disadvantages regarding equipment required or used for this procedure are:
1.5. Method Performance (See Section 4 for more detailed information)
| Note: | During the evaluation, six instruments were used
for each experiment. Imprecision was likely greater than if only
one instrument were used and the experiment repeated six times;
however, the statistical values obtained will be more
representative of OSHA field office use. Many OSHA field offices
are supplied with five or more monitors and an industrial
hygienist may randomly take one or more instruments into the
field for monitoring. As previously discussed in Section 1.3.4.,
both truncated and |
- 1.5.1. Range
The upper analytical range used during the TWA PEL studies was
about 70 ppm. The Ceiling study was conducted at about 200 ppm. The
overall range according to the manufacturer is
1.5.2. Precision, Accuracy, Detection Limits
Values determined during the validation are listed below. For further information see Section 4.
| Truncated |
Hand-Calculated | |
| Range* | ||
| % Mean Recovery | 96.1 - 112.4 | 96.6 - 114.0 |
| CV (Individual experiments) | 0.024 - 0.058 | 0.021 - 0.056 |
| Bias | -0.016 - 0.062 | -0.007 - 0.075 |
| CV2 (Pooled) | 0.040 - 0.048 | 0.032 - 0.045 |
* Includes different RHs and concns - 30 to 80% RH, 16.1 to 70.2 ppm | ||
| Detection Limits | ||
| Qualitative: | 1.2 ppm | 0.5 ppm |
| Quantitative: | 4.1 ppm | 1.8 ppm |
| Precision and Accuracy** | ||
| CV2 (Pooled): | 0.040 | 0.041 |
| Bias: | -0.016 | -0.007 |
| Overall Error: | ±9.6% | ±8.8% |
** Only data for 0.5 to 2 times PEL, 50% RH is listed | ||
1.6. Interferences
| Note: | The following paragraphs list specific
interferences associated with the Draeger Datalogger. If other
types of instruments are used, always consult with the
manufacturer or |
The following interferences occur with the CO-specific filter attached to the monitor. Acetylene and hydrogen have small positive interferences (97 ppm acetylene will indicate 10 ppm CO, 1,000 ppm hydrogen will indicate 40 ppm CO ) (5.13.). During the evaluation of the Draeger Datalogger, it was noted high concentrations of the lower alcohols produced large positive biases when the monitor was exposed to headspace concentrations. Dataloggers were also placed near the open tops of glass bottles containing the chemicals listed below and monitor response was noted:
| Chemical |
Response |
Chemical |
Response | |||||
| acetonitrile | no response | |||||||
| ethanol | positive | acetone | no response* | |||||
| isobutanol | positive | butylamine | no response | |||||
| isopropanol | positive | dimethylamine | no response | |||||
| methanol | positive | ethyl acetate | no response | |||||
| n-propanol | positive | formaldehyde | no response** | |||||
| isooctane | no response | |||||||
| 1-octanol | no response | |||||||
| toluene | no response | |||||||
| ||||||||
The responses indicated lower alcohols gave positive responses and
others structurally similar to CO (i.e. acetone) could give a response
if the CO-specific filter is removed or the filter has diminished
capacity. Placement of the monitors into atmospheres saturated with
each substance giving a positive response gave very large false
positive readings for CO and also tended to fatigue the sensor. In
addition, fine mists or droplets of the positive-interfering
substances will produce similar false positive results. These
interferences were produced using
Early reports from other Datalogger users indicated a positive bias was observed when the monitor was placed near liquid aerosol streams. To assess if small liquid droplets could trigger a positive reading, aerosols of water or ethyl acetate were sprayed directly above the monitor sensor and produced no response.
1.7. Physical Properties (5.15., 5.16.) and CAS No.
| CAS No. (Carbon Monoxide) | 630-08-0 |
| Molecular weight | 28.01 |
| Molecular formula | CO |
| Appearance | Colorless, odorless gas |
| Explosive limits in air | 12.5 to 74.2% (v/v) |
| Autoignition temperature | 651°C |
| Melting point | -207°C |
| Boiling point | -191.3°C |
| Specific gravity (air = 1) | 0.968 |
| Density, gas at 0°C, 101.3 kPa (760 mmHg) |
1.25 g/L |
| Solubility at 0°C at 25°C |
3.54 mL/100 mL water 2.14 mL/100 mL water |
1.8. Prevalence and Use of CO
With the single exception of CO2, the total yearly emissions of CO exceed all other atmospheric pollutants combined (5.16.). Potential sources for CO emission and exposure are listed (5.16., 5.17.):
| Foundries Petroleum refineries Fluid catalytic crackers Fluid coking operations Moving-bed catalytic crackers Kraft pulp mills Carbon black manufacturers Steel mills Coke ovens Basic oxygen furnaces Sintering operations |
Formaldehyde
manufacturers Coal combustion facilities Utility and large industrial boilers Commercial and domestic furnaces Fuel oil combustion operations Power plants Industrial, commercial, and domestic uses Charcoal manufacturers Meat smokehouses Sugarcane processing operations Motor vehicles |
1.9. Toxicology
| Note: | Information contained within this section is a synopsis of the present knowledge of the physiological effects of CO and is not necessarily intended to be used as the basis for OSHA policy. |
Carbon monoxide has over a 200-fold greater affinity for hemoglobin
than has oxygen (5.18.,
5.19.).
Thus, it can make hemoglobin incapable of carrying oxygen to the
tissues. The presence of
The signs and symptoms of CO poisoning include headache, nausea, weakness, dizziness, mental confusion, hallucinations, cyanosis, and depression of the S-T segment of an electrocardiogram. Although most injuries in survivors of CO poisoning occur to the central nervous system, it is likely that myocardial ischemia is the cause for many CO-induced deaths (5.18.).
The uptake rate of CO by blood when air containing CO is breathed increases from 3 to 6 times between rest and heavy work. The uptake rate is also influenced by oxygen partial pressure and altitude (5.20.).
Carbon monoxide can be removed through the lungs when CO-free air is breathed, with generally half of the CO being removed in 1 hour. Breathing of 100% oxygen removes CO quickly.
Acute poisoning from brief exposure to high concentrations rarely leads to permanent disability if recovery occurs. Chronic effects from repeated exposure to lower concentrations have been reported. These include visual and auditory disturbances and heart irregularities. Where poisoning has been long and severe, long-lasting mental and/or nerve damage has resulted (5.15.).
The following table gives the levels of COHb in the blood which tend to form at equilibrium with various concentrations of CO in the air and the clinical effects observed (5.21.):
| Atmospheric CO (ppm) |
COHb in Blood (%) |
Symptoms |
|
| ||
| 70 | 10 | Shortness of breath upon vigorous exertion; possible tightness across the forehead. |
| 120 | 20 | Shortness of breath with moderate exertion; occasional headache with throbbing in the temples. |
| 220 | 30 | Decided headache; irritability; easy fatiguability; disturbed judgment; possible dizziness; dimness of vision. |
| 350-520 | 40-50 | Headache; confusion; collapse; fainting upon exertion. |
| 800-1220 | 60-70 | Unconsciousness; intermittent convulsions; respiratory failure; death if exposure is prolonged. |
| 1950 | 80 | Rapidly fatal. |
|
| ||
Adults (non-smokers) normally have about 1% COHb in the body. Cigarette smokers generally have blood levels of 2 to 10% COHb (5.20.).
In examining the CO levels in an occupational environment, CO generated from tobacco smoking may need to be considered. These amounts may ordinarily be small, but when added to the amounts generated by occupational activities, may aggravate conditions from an already existing high concentration of CO (5.22., 5.23.).
1.10. Other Hazardous Properties
Carbon monoxide is flammable and can be a dangerous fire and explosion risk. The flammable limits in air range from 12 to 75% by volume (5.19.).
| Note: | A training videotape (Draeger part no. 4505202) is available from Draeger regarding Datalogger 190 use and data transfer. |
- 2.1. Precautions
- 2.1.1. Be certain that the radio frequency shielding of the
monitor is intact.
2.1.2. Attach the monitor to the worker in such a manner that it will not interfere with work performance or safety.
2.1.3. Follow all safety practices that apply to the work area being sampled.
2.1.4. If the employee being monitored is smoking a tobacco product during sampling, a positive contribution of CO from the tobacco combustion may occur for personal samples. Ask the employee to refrain from smoking during sampling so that only the occupational exposure is considered.
2.1.5. Describe the audible alarms to the employee, and instruct the employee on what to do if they occur. The alarm is normally set to a level slightly above the OSHA Ceiling Exposure Limit of 200 ppm CO.
| Note: | The Immediately Dangerous to Life and Health (IDLH) and the OSHA Instantaneous Limit are the same concentration, 1,500 ppm CO. The Datalogger discussed in this method is unable to measure above 999 ppm. If the Datalogger registers readings above 999 ppm, appropriate protective measures should be taken to safeguard those exposed. If necessary to document excursions above the IDLH or OSHA Instantaneous Limit, detector tubes listed in the OSHA Chemical Information File can be used provided measurements can be safely taken. |
2.2. Equipment
- 2.2.1. CO Datalogger or other validated
2.2.2. Gases for calibration:
2.3. Sampling Procedure
- 2.3.1. See Appendix
B regarding specific information on preparation, alarm
adjustment, calibration, and other procedures for the Draeger Model
190 Datalogger.
2.3.2. Calibration - Use only certified calibration gases. For OSHA purposes, the recommended concentration of the calibration gas (span gas) is 30 to 70 ppm CO (listed to the nearest 0.1 ppm). Gas cylinders are available from the OCL (see Appendix C)(5.24.). The gas cylinders can be mailed or expressed to the site from OCL using appropriate shipping procedures.
| Notes: |
|
2.3.3. General instructions - Sampling with a
3. Data Recovery
- 3.1. Refer to instrument manuals and operating procedures for
proper operation of all instruments. See Appendix
B for information on the data recovery procedures for the Draeger
Model 190 Datalogger.
3.2. Calculate Ceiling exposures if they are not
calculated in
3.3. Generate hard copies of the results. Show a display of the results and a graph.
3.4. Report the results as ppm CO.
Experimental Protocol
The evaluation of the instrument consisted of the following experimental protocol:
All results were statistically examined for outliers and, when necessary to pool results, homogeneous variance. Possible outliers were determined using the American Society for Testing and Materials (ASTM) test for outliers (5.25.). Homogeneity of the coefficients of variation was determined using the Bartlett's test (5.26.). Overall Error was calculated as:
where i is the respective instrument pool being examined (5.27.).
Six Dataloggers were used, and the statistical values for each set of determinations are based on the analysis of data consisting of one result from each of the six instruments.
This evaluation was split into two blocks of time [early work ("A" experiments) and later work ("B" experiments)].
- 4.1. Analysis - Because of the nature of the monitor and the data
collection procedure, the sample spiking procedure normally performed
during the evaluation of a sampling and analytical method was not
possible; therefore, this experiment (analytical recovery,
CV1) is not relevant to this
4.2. Sampling and Analysis
Procedure: Three sets of samples (at 0.5, 1, and 2 × TWA PEL) were collected and evaluated. Samples taken at 5 and 10 ppm CO (50% RH) were also prepared and analyzed. Six Dataloggers were evaluated at each of these sampling conditions. Samples were collected according to the procedure listed below.
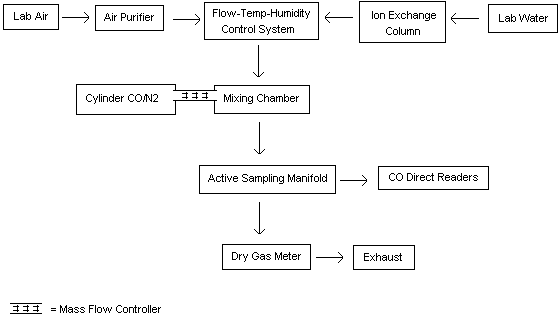
- 4.2.1. A dynamic gas generation system was
assembled as shown in Figure 1a.
Moisture and other contaminants were removed from the diluent air by
using a charcoal/Drierite/silica gel filtering system. A hopcalite
filtering system was also used in part of the later work ("B"
experiments) in an attempt to reduce any background CO
concentration. A humidity, temperature, and flow control system
(Model HCS-301, Miller-Nelson Research Inc., Monterey, CA) was used
to treat the diluent air to produce the stated RH at 25°C. Diluent
air flow was measured before and after each experiment using a dry
test meter (DTM-115, American Meter Co., Philadelphia, PA). The flow
control system had earlier been calibrated in-house for temperature
and humidity. The Dataloggers were connected to the sampling
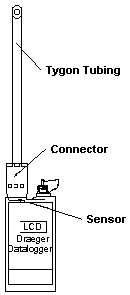
manifold of the generation system using connectors (Figure 1b)
similar to the one used for calibration. The free end of the
Tygon® tubing was attached to a sampling
manifold exit port (Teflon® tubing) for
each Datalogger.
For connectors, short pieces of rubber tubing slipped over rubber stoppers were drilled in the sides to allow test atmospheres moving down the Tygon® tubing to freely exit. The connectors were then used to attach the Datalogger sensor and Tygon tubing together. These connectors had slightly larger exit holes than the calibration units shown in Appendix B (Figure 8) to allow the generated atmosphere to freely pass over the sensor during testing. This type of sampling connection allowed the linear face velocity to be altered during testing. Passive monitor test chambers were used in additional experiments (Sections 4.4. and 4.6.) without the use of connectors.
4.2.2. A gas cylinder containing approximately 0.5% CO in nitrogen was used as the CO source. For the "A" experiments, the gas was from Linde Div., Union Carbide Corp., Denver, CO (concentration certified at 0.50%). For the "B" experiments, the gas was from Airco, Riverton, NJ (certified at 0.496%). The CO was introduced into the flow system via a glass mixing chamber. Gas flow rates were controlled using a mass flow controller (Model FC-261, Tylan Corp., Torrance, CA). Gas flows were measured immediately before and after each experiment using a soap bubble flowmeter (Model 823-1, Mast Development Co., Davenport, IA).
4.2.3. To assure a continuous generation of controlled
concentrations of CO and provide an additional verification of
concentrations, the flow system was continuously monitored during
each test by noting the LCD readings on the Dataloggers and, during
the "A" experiments, with a
4.2.4. Calibration of the Dataloggers during
the "A" experiments was performed with the
| Note: | Preliminary experiments and a personal communication with the manufacturer indicated that the concentration of the calibration gas did not appear to have a significant effect on precision and accuracy as long as the calibration concentration was in the vicinity of the PEL. The manufacturer did state the higher calibration concentration (104 ppm CO) would probably give slightly more accurate results because of the greater linear range. |
4.2.5. During the course of each "A" experiment, the monitors were calibrated and then attached to the generation system. The tempered CO/air mixture from the system was permitted to flow over the sensors and datalogging was initiated. At the conclusion of the experiment the logging was stopped and the monitors were removed from the system. The collected data were then downloaded to a computer.
For the "B" experiments a calibration was performed, then readings from the monitor LCDs were taken with only air flowing through the system. The CO flow was then started and, after stabilizing, datalogging was begun. At the conclusion of the experiment, datalogging was stopped, CO gas flow was stopped, monitor readings of the generation system air were again obtained, and then the monitors were removed from the system. (Note: A few problems occurred during the generations and are further discussed following the Results Section.)
Results: The results for generated samples at 0.5, 1, and
2 × PEL (50% RH) based on the TWA output values are listed in Table
1a.
These represent Datalogger outputs [i.e., results are rounded down
(truncated) to the next lower integer ppm value by the Datalogger].
The results for the generated samples based on the actual rounded
The "A" experiments were conducted using calibration flow rates slightly higher than the recommended rate of 0.2 L/min. This would result in slightly lower Datalogger concentration readings during the "A" experiments. However, uncompensated background CO in the diluent air would result in a slightly larger generated CO concentration than the theoretical calculations. Thus, one source of error could have canceled the other.
The sampling and analysis data showed very good precision and accuracy. All data passed the outlier and Bartlett's tests; therefore, the data were pooled. The CV2 (Pooled) value based on the TWA output values is 0.040 for samples taken in the range of 16 to 70 ppm CO (50% RH).
| Note: | Two problems were noted during the generations.
These were sensor face velocity dependence, and background
contamination during the "B" experiments.
Using the tubing devices similar in design to the Draeger calibration adapter to connect the Dataloggers to the sampling manifold of the generation system, it was found that increasing the flow rate of CO-containing air over the Datalogger sensor tended to result in higher CO concentration readings, even though the concentration had not changed. This was possibly due to a slight increase in pressure at the face of the sensor caused by the high gas flow rates through the connecting tubing. The pressure at each sampling port was estimated by a water manometer to be 2 to 6 mm water above the surrounding atmosphere. Flow rates used during the studies tended to be higher than the 0.20 L/min recommended for normal calibrating. Slight increases in CO recoveries possibly occurred due to increased pressure and not from humidity. This calibration flow rate dependence is further discussed in Section 4.6. For two of the "B" experiments (1 × PEL, 30% RH and 0.5 × PEL, 80% RH) an attempt was made to examine this effect by having significantly different gas flows when calibrating and taking the samples. The other "B" experiments were conducted by closely matching the calibration gas flow with the generation system flow. Also during the "B" experiments, it was noted that significant background levels of CO existed in the laboratory atmosphere, in some cases up to 6 ppm. This was readily apparent when observing the Dataloggers' operation after zeroing the monitors with nitrogen. At the time of the "B" experiments, a climatic temperature inversion occurred, and higher than normal concentrations of CO were retained in the lower atmosphere. Because the diluent air is prepared from atmospheric air, this contamination could result in higher than normally expected CO concentrations in the generating system. Normal expected background CO concentrations in the generation system were <1 ppm. Prescrubbing the diluent air for the generation system through hopcalite removed only about one-half the amount of CO. With the hopcalite prescrubbing, the CO concentration was still occasionally observed to drift slightly as the experiment proceeded. To compensate for the elevated CO background noted during the "B" experiments, "blank addition" was performed. The background CO concentration was determined by averaging a few monitor readings after the monitors were connected to the generation system with the dilution air passing over them (prior to 0.5% CO addition) and also at the conclusion of the experiment (after the 0.5% CO had been turned off). The average CO concentration determined from these readings was added to the theoretical concentration derived from the CO gas and diluent air flows to obtain a corrected theoretical concentration. These corrections ranged from 0.5 to 4 ppm CO. |
4.3. Sampling and Analysis at Low CO Levels
Procedure: In order to evaluate the Dataloggers at CO levels commonly encountered during IAQ investigations, test atmospheres at about 5 and 10 ppm CO (50% RH) were prepared and Datalogger samples were taken, using the same equipment and the sensor conditions described in Section 4.2. The effects of the gas flow rate over the sensor, as well as the CO background concentration in the generator diluent air, were accounted for in these studies. Six Dataloggers were evaluated at each concentration.
Results: Recoveries for the samples generated at
approximately 5 and 10 ppm CO are given in Table 2a
(Datalogger truncated TWA output values) and Table 2b
(
Results at 5 ppm gave a large OE value; however, this concentration
level is very low in relation to the TWA PEL for CO. The
4.4. Sampling and Analysis at Ceiling CO Levels
Procedure: In order to evaluate the Dataloggers at CO levels
in the vicinity of the Ceiling PEL (for a
After the CO concentration in the chamber had stabilized (determined by observing the monitor LCDs through the glass chamber wall), two gas bag samples of the CO/air mixture were taken for GC analysis from a sampling manifold connected to the Du Pont chamber. At about 50 min after the CO concentration had stabilized, the gas flows were stopped and the Dataloggers were removed and datalogging was halted.
Results: Recoveries for the samples generated at
approximately 200 ppm CO are given in Table 3.
The
4.5. Humidity Study
Procedure: Samples were also generated at 30% and 80% RH using the same equipment and conditions described in Section 4.2. An experiment was not conducted for 2 × TWA PEL at 30% RH.
Results: The results for the generated samples collected at the three RH levels are listed in the following Tables:
| Table | % Humidity | Determination |
| 1a 1b 4a 4b 5a 5b |
50 50 30 30 80 80 |
Truncated values Hand-calculated average values Truncated values Hand-calculated average values Truncated values Hand-calculated average values |
Two "B" experiment tests (1 × PEL at 30% RH and 0.5 × PEL at 80% RH) showed a positive bias in the mean recoveries obtained. These were initial "B" experiments, and were conducted with calibration flow rates lower than generation system flow rates. The increased flow across the sensor face as compared to the calibration flow was suspected of causing the higher bias.
As shown in Table 6, an analysis of variance (F test) (5.30.) was performed on the data to determine any significant difference among or within the various RH groups. Variance at each concentration (0.5, 1, and 2 × TWA PEL) was compared across the three RH levels (30%, 50%, and 80% RH). The variance among and within the different concentration groups gave high calculated F values at 0.5 and 1 × PEL. The large calculated F values appear to be mainly due to variability in mean recoveries, and are most likely related to variance from sensor face velocity differences within the experiments.
Recalculation of F values after making estimated corrections for face velocity differences between calibrations and generation system measurements reduced the F values considerably.
4.6. Assessment of the Rate of Gas Flow on the Datalogger Readings
Procedure: As mentioned previously in Section 4.2.1., tubing devices similar to the Draeger calibration adapter were used to connect the Dataloggers to the generation system. Under these conditions, generation system flow rates over the Datalogger sensor faces (linear face velocities) tended to be high, and therefore, higher CO sample concentration readings were obtained.
An investigation of face velocity dependence of gas flowing through the calibration adapter or similar tubing was conducted with six Dataloggers which were calibrated with the 104-ppm CO certified standard mentioned in Section 4.2.4. Four different sets of tests were conducted:
Results: For test (1), the Datalogger readings as a function of gas flow across the face of the sensor (face velocity) are given in Figure 2. It is evident that the readings tend to rise as the linear flow increases, and a "steady state" is achieved where the readings stop rising at a certain point.
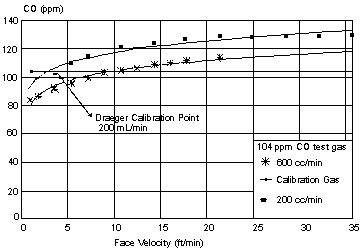
Gas flow rates over the sensor in metric units are given below.
| Gas Flow Rate Over
Sensor | ||
| L/min |
m/min* |
ft/min |
| 0.0532 0.103 0.201 0.303 0.405 0.506 0.599 0.700 0.805 0.903 1.006 1.206 1.402 1.610 1.804 2.002 |
0.29 0.56 1.09 1.65 2.20 2.75 3.26 3.81 4.38 4.91 5.47 6.56 7.62 8.75 9.81 10.89 |
0.9 1.8 3.6 5.4 7.2 9.0 10.7 12.5 14.4 16.1 17.9 21.5 25.0 28.7 32.2 35.7 |
| * Based on a measured sensor exposure area of 1.839 cm2 | ||
For test (2) the rise in observed readings was less pronounced when tubing similar to the calibration tubing was replaced with the loose-fitting glass tube. It should be stressed in either test, the flow of the CO/air mixture is being applied directly at the sensors.
The Datalogger dependence on face velocity appears important during calibrations and appears partially due to increased pressure on the sensor face. Although the curvature shown in Figure 2 is important during calibration, it follows a similar pattern noted with other passive monitors. Face velocity dependence has been noted previously (5.29.), and it is not unusual for a monitor to have:
This effect of air flow rate on the results for passive monitors has been discussed further in a report from the National Institute for Occupational Safety and Health (5.31.). Typical face velocities in general industry, according to the NIOSH report (5.31.) are 10 to 150 cm/s (approximately 6 to 90 m/min or 20 to 300 ft/min).
In test (3) where the nitrogen flow after zeroing was altered, there was no significant change from zero as the flow rate of nitrogen increased. This indicates that pressure alone is not responsible for the elevated readings noted in tests (1) and (2).
In test (4) where the monitors were exposed to the rapidly moving turbulent air, the monitor readings leveled off in the range of 103 to 114 ppm CO. The readings were similar even when the fan was turned off. It appears the monitors are only slightly affected by turbulent air flows of 15.2 to 91.4 m/min (50 to 300 ft/min) where a positive bias of approximately 5 to 10% was noted. The monitor appears more affected by linear flows. It is expected in many industrial settings the air flow will move in a turbulent fashion.
The manufacturer has reported the following calibration flow deviations when CO-containing gas flow rates different from the recommended 0.20 L/min are used:
| Ft/min |
L/min |
% Error | ||
| 2.7 | 0.17 | -8 | ||
| 2.9 | 0.18 | -7 | ||
| 3.3 | 0.21 | <3 | ||
| 3.7 | 0.23 | <3 |
These
Both series of internal and
4.7. Detection Limits
Procedure: Both qualitative and quantitative limits for the analysis of CO by the Dataloggers were calculated using the International Union of Pure and Applied Chemistry (IUPAC) method for detection limit determinations (5.33.). The data collected at 50% RH and 5.6, 11.1, and 16.1 ppm (Tables 1a, 1b, 2a, and 2b) were used. Also included were data from a blank generation in which no CO was added. The blank generation was performed when the background CO level in the air was at a very low level (0 to 1 ppm).
Results: The detection limit results are listed in Table 8a
(for the truncated TWA output values) and Table 8b
(for the
| Detection Limit |
Truncated TWA Values |
Hand-Calc. Ave of | ||
| Qualitative: | 1.2 ppm | 0.5 ppm | ||
| Quantitative: | 4.1 ppm | 1.8 ppm | ||
The lower detection limits for the "Hand-Calc. Ave." of all the
4.8. Comparison of Methods
Procedure: In order to confirm the accuracy of the CO concentration of the 0.50% and 0.496% CO sources used in the generation system, as well as the accuracy of generation, one or two gas bag samples were taken from the generated gas stream during each Datalogger study. Bags employed were 5-L five-layer aluminized gas bags (Calibrated Instruments, Inc., Ardsley, NY). Analysis of the CO content of the gas bags was performed with a Tracor Model No. 540 GC equipped with a Model No. 706 DID according to OSHA Method ID-210 (5.12.). Standards were prepared from the cylinder of 104-ppm CO in nitrogen previously discussed in Section 4.2.4.
The CO concentration of this gas cylinder had been confirmed during previous work by reaction with iodine pentoxide and titration of the subsequent iodine produced (5.12.).
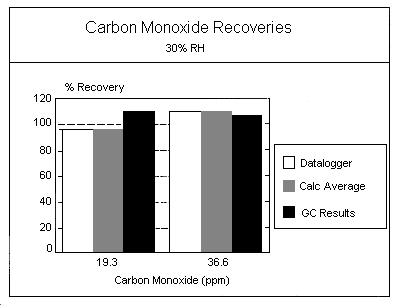
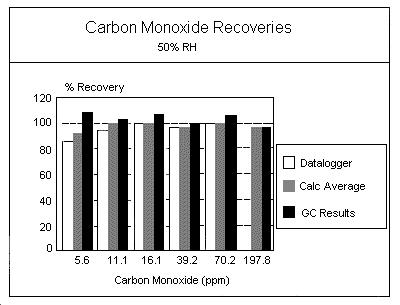
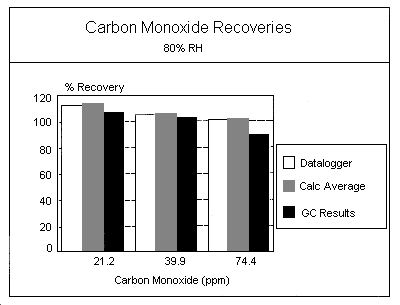
Results: The GC results were compared with theoretical
values (e.g., "GC Results" = GC Recovery/Theoretical Value).
Theoretical values were calculated from generation system flow
settings. As shown in Figures 3
- 5,
good agreement is noted between theoretical and GC results. The
Datalogger results ("Datalogger" = TWA Output Values, Calc Average =
Hand-Calculated Average Values) are also illustrated for comparison
purposes. It should be noted in Figure 4
the TWA output value (Datalogger result) for the Ceiling determination
is not present. In this case the results were
4.9. Conclusions
The experimental results indicate this
Because the instrument automatically performs integer math for calculations (truncating to the next lower integer ppm value), rounding-off error for the resulting TWA output values is possible. This does not appear problematic for CO concentrations normally encountered in industry, and is aptly shown by comparable precision and accuracy data obtained when testing in the vicinity of the PEL (Tables 1a and 1b). The error does become significant at single digit levels (i.e., <10 ppm); however, these levels are well under the present TWA PEL. It should also be pointed out that in workplace environments the CO level will not be static and may quite often rise to high concentrations and fall to single digit values in one monitoring period.
Determinations near the TWA PEL were well within NIOSH and OSHA accuracy and precision guidelines (5.26., 5.27.). For the truncated TWA output values at 50% RH, the pooled coefficient of variation (CV2) was 0.040 and the overall recovery was 98.4%. An effect from humidity is not apparent. In two cases where the OE values appear somewhat high (1 × PEL at 30% RH and 0.5 × PEL at 80% RH), face velocity and increased pressure at the sensor face appear as contributory factors. The manufacturer of the Datalogger may need to further investigate interferences caused by low molecular weight alcohols and aldehydes which appear structurally similar to the CO molecule. These interferences are not expected to be significant in normal workplace monitoring but may cause problems during confined space evaluations.
The OE values at approximately 5 and 10 ppm CO were somewhat high, but within NIOSH and OSHA guidelines if non-truncated values are used.
The Dataloggers are very convenient to use. There is minimum interference with work procedures by employees. The exposure data are stored and easily recovered to produce a minute-by-minute record of the working environment.
This sampling and analytical method is capable of accurate and precise measurements to determine compliance with the 35-ppm TWA or 200 ppm Ceiling PEL for CO exposures.
5. References
- 5.1. "Air Contaminants; Final Rule" Federal
Register 29 CFR Part 1910 (19 Jan. 1989). pp.
5.2. United States Department of Labor, OSHA: "Memorandum, Updated Changes to 29 CFR 1910.1000, Air Contaminants Standard." by Patricia Clark, Director Designate, Directorate of Compliance Programs. United States Department of Labor, OSHA, Washington, DC, June 1, 1990. [Memo].
5.3. "Air Contaminants; Corrections" Federal
Register 29 CFR Part 1910 (1 July 1992). pp.
5.4. Occupational Safety and Health Administration Salt Lake Technical Center: Chemical Information File, Online Database-OSHA Information System. Salt Lake City, UT: Occupational Safety and Health Administration Salt Lake Technical Center, 1989.
5.5. Katz, M., ed.: Methods of Air Sampling and Analysis. 2nd ed., APHA Intersociety Committee. Washington, D.C.: Publication Office, American Public Health Association, 1977. No. 132, pp. 368-369.
5.6. Occupational Safety and Health Administration Salt Lake Technical Center: Carbon Monoxide Detector Tubes (Short-Term) (USDOL/OSHA-SLTC PE-11). Salt Lake City, UT: Occupational Safety and Health Administration Salt Lake Technical Center, 1990.
5.7. Occupational Safety and Health Administration Salt Lake Technical Center: A Laboratory Evaluation of Draeger Long Duration Carbon Monoxide Detector Tubes (USDOL/OSHA-SLTC PE-3). Salt Lake City, UT: Occupational Safety and Health Administration Salt Lake Technical Center, 1981.
5.8. National Institute for Occupational Safety and Health: NIOSH Manual of Analytical Methods. 2nd. ed., Vol. 1 (Method No. P&CAM 112) (DHEW/NIOSH Pub. No. 77-157-A). Cincinnati, OH: National Institute for Occupational Safety and Health, 1977.
5.9. National Institute for Occupational Safety and Health: NIOSH Manual of Analytical Methods. 2nd. ed., Vol. 4 (Method No. S340) (DHEW/NIOSH Pub. No. 78-175). Cincinnati, OH: National Institute for Occupational Safety and Health, 1978.
5.10. Mine Safety and Health Administration: Regular Mine Gas Analysis (MSHA Standard Method No. 1). Denver, CO: MSHA, 1979.
5.11. Williams, D.M.: "Unique Applications for New Helium Glow Discharge Ionization Detector for Gas Chromatography." Paper presented at the 1988 Pittsburgh Conference, New Orleans, LA, February 1988.
5.12. Occupational Safety and Health Administration Salt Lake Technical Center: Carbon Monoxide in Workplace Atmospheres (USDOL/OSHA-SLTC Method No. ID-210). Salt Lake City, UT: Occupational Safety and Health Administration Technical Center, 1991.
5.13. National Draeger, Inc.: Draeger Model 190 Datalogger, CO, Operating Manual. Pittsburgh, PA: National Draeger, Inc., No date specified.
5.14. American Society of Heating, Refrigerating and Air-Conditioning Engineers Inc.: Ventilation for Acceptable Indoor Air Quality. ASHRAE 62-1989. Atlanta, GA: American Society of Heating, Refrigerating and Air-Conditioning Engineers, 1989. pp. 1-26.
5.15. Sax, N.I.: Dangerous Properties of Industrial Materials. 4th ed. New York: Van Nostrand Reinhold Company, 1975. pp. 520-521.
5.16. National Institute for Occupational Safety and Health: Criteria for a Recommended Standard-Occupational Exposure to Carbon Monoxide (DHEW/NIOSH Pub. HSM 73-11000). Cincinnati, OH: National Institute for Occupational Safety and Health, 1972.
5.17. Coburn, R.F., Chairman: Carbon Monoxide. Washington, DC: National Academy of Sciences, 1977.
5.18. Proctor, N.H. and J.P. Hughes: Chemical Hazards of the Workplace. Philadelphia, PA: J.B. Lippincott Co., 1978. pp. 151-153.
5.19. Sax, N.I. and R.J. Lewis, Sr.: Hawley's Condensed Chemical Dictionary. 11th ed. New York: Van Nostrand Reinhold Co., 1987. pp. 221-222.
5.20. American Conference of Governmental Industrial Hygienists: Documentation of the Threshold Limit Values for Substances in Workroom Air. 3rd ed. Cincinnati, OH: American Conference of Governmental Industrial Hygienists, 1971. pp. 41-43.
5.21. Ellenhorn, M.J., and D.G. Barceloux: Medical Toxicology. New York, NY: Elsevier Science Publishing Co., Inc., 1988. p. 821.
5.22. Lee, H.K., T.A. McKenna, L.N. Renton, and J. Kirkbride: Impact of a New Smoking Policy on Office Air Quality. In Indoor Air Quality in Cold Climates: Hazards and Abatement Measures, edited by D.S. Walkinshaw. Pittsburgh, PA: Air Pollution Control Association, 1986. pp. 307-322. (NIOSH-00172085).
5.23. Leaderer, B.P., W.S. Cain, R. Isseroff, and L.G. Berglund: Ventilation Requirements in Buildings. II. Particulate Matter and Carbon Monoxide from Cigarette Smoking. Atmospheric Environment 18, No. 1: 99-106 (1984). (NIOSH-00137853).
5.24. U.S. Department of Labor - OSHA: "Additions to Supplies Furnished by OCL, Memorandum for Regional Administrators, Area Directors, ARA's for Technical Support, Health Response Team." by Robert T. Williams. U.S. Department of Labor - OSHA, Cincinnati Laboratory, Cincinnati, OH, May 8, 1992. [Memo].
5.25. Mandel, J.: Accuracy and Precision, Evaluation and Interpretation of Analytical Results, The Treatment of Outliers. In Treatise On Analytical Chemistry. 2nd ed., Vol. 1, edited by I.M. Kolthoff and P.J. Elving. New York, NY: John Wiley and Sons, 1978. pp. 282-285.
5.26. National Institute for Occupational Safety and Health: Documentation of the NIOSH Validation Tests by D. Taylor, R. Kupel and J. Bryant (DHEW/NIOSH Pub. No. 77-185). Cincinnati, OH: National Institute for Occupational Safety and Health, 1977. pp. 1-12.
5.27. Occupational Safety and Health Administration Salt Lake Technical Center: OSHA Analytical Methods Manual. Vol. III (USDOL/OSHA-SLTC Method Validation Guidelines). Cincinnati, OH: American Conference of Governmental Industrial Hygienists (Pub. No. ISBN: 0-936712-66-X), 1985.
5.28. Freeland, L.T.: An industrial hygiene calibration manifold. AIHAJ 38: 712-720 (1977).
5.29. Occupational Safety and Health Administration Salt Lake Technical Center: Evaluation of a Solid Sorbent Passive Dosimeter for Collecting Mercury Vapor (USDOL/OSHA-SLTC Backup Report No. ID-140). Salt Lake City, UT: Occupational Safety and Health Administration Technical Center, revised 1989.
5.30. Dowdy, S. and S. Wearden: Statistics for Research. New York: John Wiley and Sons, 1983. Chapter 8.
5.31. Cassinelli, M.E., R.D. Hull, J.V. Crable, and A.W. Teass (National Institute for Occupational Safety And Health): Protocol for the Evaluation of Passive Monitors. In Diffusive Sampling - An Alternative Approach to Workplace Air Monitoring, The Proceedings of an International Symposium held in Luxembourg, 22-26 September 1986, edited by A. Berlin, R.H. Brown, and K.J. Saunders. London: The Royal Society of Chemistry, Burlington House, 1987. pp. 190-202.
5.32. Nancy Hoblack: "Effect of Air Velocity on Draeger CO Datalogger Readings." July 9, 1992. [Private Communication]. Nancy Hoblack, National Draeger, Inc., 101 Technology Drive, Pittsburgh, PA 15230.
5.33. Long, G.L. and J.D. Winefordner: Limit of Detection - A Closer Look at the IUPAC Definition. Anal. Chem. 55: 712A-724A (1983).
5.34. National Draeger, Inc.: Enhanced Graphics Software (Version 1.0), Operating Manual. Pittsburgh, PA: National Draeger, Inc.
5.35. U.S. Department of Labor - OSHA: "National Draeger CO Dosimeters, Memorandum for Rick Cee." by Robert T. Williams. U.S. Department of Labor - OSHA, Cincinnati Laboratory, Cincinnati, OH, February 7, 1991. [Memo].
The saturated vapor concentrations for interferences discussed in
Section 1.6.
of this method were estimated from commonly found vapor pressure data. Six
values for the temperature versus vapor pressure were given for each
compound (the vapor pressure values were taken from the following
reference: Lide, David R., ed.: CRC Handbook of Chemistry and Physics.
73rd ed. Boca Raton, FL: CRC Press, 1992-1993. pp. 6-68 to
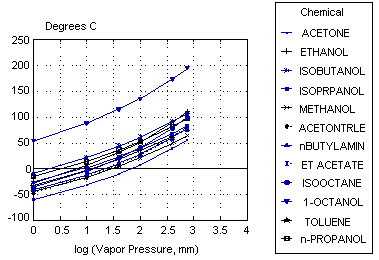
The vapor pressures listed below at 25°C were determined by interpolation. The saturated vapor concentration was then calculated using the equation:
| Where: | vp P |
= = |
vapor pressure atmospheric pressure |
The tests were performed at an atmospheric pressure of approximately 650 mmHg. These are estimates of the concentration near the surface of the liquid; in practice, the Datalogger was held a short distance away from the liquid surface. The actual concentration of each substance during interference measurements was less than reported here.
| Vapor | ----------Concentration (ppm)---------- | ||||||||
| Name | Pressure (mmHg) | P@760 mmHg | P@650 mmHg | ||||||
| Acetone | 223.9 | 295,000 | 344,000 | ||||||
| Ethanol | 57.5 | 75,700 | 88,500 | ||||||
| Isobutanol | 12.6 | 16,600 | 19,400 | ||||||
| Isopropanol | 43.7 | 57,500 | 67,200 | ||||||
| Methanol | 123.0 | 162,000 | 189,000 | ||||||
| Acetonitrile | 91.2 | 120,000 | 140,000 | ||||||
| n-Butylamine* | 85.1 | 112,000 | 131,000 | ||||||
| Ethyl acetate | 93.3 | 123,000 | 144,000 | ||||||
| Isooctane** | 50.1 | 65,900 | 77,100 | ||||||
| 1-Octanol | 0.1*** | 130 | 150 | ||||||
| Toluene | 28.2 | 37,100 | 43,400 | ||||||
| n-propanol | 20.4 | 26,800 | 31,400 | ||||||
| |||||||||
Two of the compounds tested for interferences with the Draeger Dataloggers were available only in diluted solutions. These were:
Formaldehyde, 37% wt/wt in water, with 10-15% methanol (preservative).Dimethylamine, 26% wt/vol in water.
Values for the partial pressures of formaldehyde over its aqueous solutions as a function of temperature and solution concentration were obtained from the following reference:
Walker, J. Frederick: Formaldehyde. American Chemical Society Monograph Series #120. New York: Reinhold Publishing Corp., 1953. p. 92.
For 36.2 g formaldehyde/100 g water at 20°C, the partial pressure of formaldehyde was given as 1.025 mmHg.
| Partial | ----------Concentration (ppm)--------- | ||
| Name | Pressure (mmHg) | P@760 mmHg | P@650 mmHg |
| Formaldehyde | 1.025 | 1,350 | 1,580 |
This value is for HCHO in pure water, whereas the solution available in the laboratory also contained methanol. No attempt was made to estimate the partial pressure of the dimethylamine over its solution.
1a. Equipment
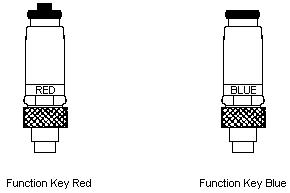
- When installing the red or blue function keys, turn only the knurled ring at the base of the key. Do not attempt to twist the entire key, as the electrical prongs can bend excessively.
- Replace the filter unit if it has become contaminated or has a large amount of trapped dust present.
- After prolonged use, the electrochemical sensor may also need to be replaced, as evidenced by erratic behavior of the values observed on the LCD.
- If part of the circuit board remains under the edge of the cover after alarm adjustment, the cover will not be completely closed and the Datalogger will not be adequately shielded from radio frequency (RF) radiation. Loss of RF shielding can result in false readings and alarms if subjected to strong RF fields (5.35.).
- The alarm set point adjustment must be done in a clean air environment to avoid false zero adjustment levels.
- 1.1.a. Draeger Model 190 CO Datalogger (Figure 6)
1.2.a. CO-specific filter (filter housing in Figure 6)
1.3.a. Red and blue function keys for starting and ending of datalogging (Figure 7)
1.4.a. Alkaline battery (9 volt)
1.5.a. A small screwdriver for adjusting the zero, span, and alarm trimpots
1.6.a. Calibration equipment and supplies
- 1.6.1.a. Calibration cylinder gas flow regulator (set to 0.20
L/min) (available from Draeger)
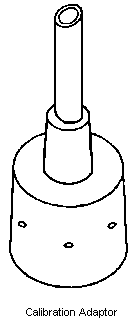
1.6.2.a. Calibration adapter (unit consisting of tubing attached to a perforated cap that fits over the monitor detection cell filter, see Figure 8)
1.6.3.a. Gas cylinder with certified CO concentration for calibration
1.7.a. Data reduction equipment
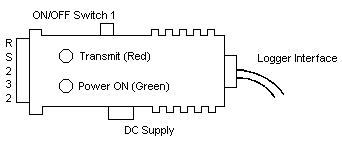
- 1.7.1.a. Draeger RS-232 Interface, consisting of a Converter Box
(25 pin) and Converter Box Power Supply for transferring the data
from the Datalogger to a computer (Figure 9)
1.7.2.a. Computer program [National Draeger Inc. Enhanced Graphic Software (EGS) 2.0 Part Number 4510259] on a 32-in. (720K byte) micro diskette or a 5¼-in. (360K byte) disk
| Note: | These versions will not transfer data compatible to standard laser printers. Dot matrix printers shall be used unless the laser printer is modified for output. Contact Draeger for additional information. |
1.7.3.a. MS-DOS operating system (Draeger did not stipulate in their documentation what version of DOS is required; however, DOS 3.3 and above appear compatible)
1.7.4.a. Computer such as an IBM or compatible AT or XT computer with an RS-232 (serial) port (Toshiba T1100PLUS Lap Top Computer)
1.7.5.a. Printer such as an IBM/Dotmatrix printer (Epson FX-86e).
2.a. Initial Preparation
- 2.1.a. Battery installation - Remove the battery cover by
loosening the two screws and lifting off the cover. Insert a fresh
9-volt alkaline battery into the battery compartment and
connect the battery terminal socket. The liquid crystal reading
initially is a very high value and the alarm may activate. As the
reading drops, eventually the alarm should become silent. Replace the
battery housing; ensure that the battery lead wires will not be caught
in between the covers. Seat the cover properly before the screws are
tightened. Usually, a battery will last for about 1 month. If the
Datalogger is not to be used for an extended period of time, the
battery should be removed.
Caution: Do not replace the battery in potentially hazardous environments where a spark might cause an explosion.
2.2.a. Stabilization - When the battery is installed or a new unit is placed in service, a 24-h stabilization period is necessary. If the battery is only being replaced and the old battery indicates a low battery condition (by a short audible tone emitted about every 10 s, or an unstable LCD reading), allow a 2-h period for stabilization. Carefully install the blue key to reset the memory.
Precautions
| Note: | The sensor contains sulfuric acid. Normally, use of the sensor does not result in exposure; however, if the container leaks or breaks, contact with the solution can cause severe burns or eye damage. If contact with the solution occurs, flush exposed body parts with cold water for about 10 min and get immediate medical attention. |
2.3.a. Alarm adjustment procedure
Precautions
Remove the filter unit from the monitor sensor. Loosen the three screws (located on the back side from the front panel) holding the housing cover in place and remove the cover. Locate the zero and alarm potentiometer adjustment screws (the alarm adjustment screw is between the zero and span adjustment screws, marked "Z" and "S" respectively). Adjust the zero potentiometer until the display indicates the ppm value of the desired alarm set point. [For compliance data collection, the alarm should be set to above 200 ppm CO (the Ceiling concentration value)]. If the alarm is sounding at concentrations lower than these, adjust the alarm set potentiometer clockwise until the alarm is silenced, then set counterclockwise until the alarm sounds. If the alarm is quiet at this concentration, adjust the alarm set potentiometer counterclockwise until the alarm sounds. Reset the zero potentiometer ("Z") to 0. Replace the housing. Be sure the battery lead wires are routed around the screw post. Tighten the three screws. Be sure the instrument circuit board in the upper chamber is properly seated and the housing is properly in place before the screws are tightened. Replace the dust filter.
3.a. Calibration
- 3.1.a. According to the manufacturer, "calibration must be
performed at least on a monthly basis to keep the Model 190 Datalogger
within published specifications" (5.13.);
however, for OSHA enforcement purposes, calibrate each time the
monitors are used.
3.2.a. The recommended concentration of the calibration gas (span gas) should be 30 to 40 ppm CO. If necessary, higher concentrations of CO, 100 ppm or more, may also be used for calibration of the Draeger Dataloggers.
| Note: | The combination of the truncation feature of the Draeger Datalogger and the recommendation that the calibration gas should be 30 to 70 ppm CO increases the potential systematic error up to 3%. Using calibration gases whose concentrations are close to integer values (i.e. 39 ppm versus 39.8 ppm) will reduce this potential error. |
3.3.a. Zero adjustment - Remove the blue function key, install the red function key and push the button on the key to stop the logging mode. Zero the instrument using the calibration adapter (see 1.6.2.a. above) and a source of CO-free nitrogen or CO-free air. Allow the nitrogen or air to flow at about 0.20 L/min until the reading stabilizes. Locate the zero adjustment screw ("Z"). Adjust the zero potentiometer until the display reads zero ppm CO. (Be certain that the potentiometer is capable of being adjusted to within ±5 ppm.)
3.4.a. Calibration procedure (Span adjustment) - IF POSSIBLE, PERFORM THIS PROCEDURE IN A WELL VENTILATED AREA SUCH AS AN EXHAUST HOOD. Attach the monitor calibration adapter to the regulator on the calibration gas cylinder. Turn on the regulator (set to a flow rate of 0.20 L/min) and purge the calibration adapter. Place the calibration adapter over the filter housing. Wait until the LCD gives a constant reading. (New sensors may take more than 2 min to stabilize.) Locate the span adjustment screw ("S") on the side of the instrument. Adjust the span potentiometer until the display indicates the ppm value of the known calibration (span) gas (rounded to the nearest whole ppm).
| Note: | Do not perform calibrations in the presence of an operating radio transmitter. |
4.a. Sampling Procedure
- 4.1.a. The unit is ready for use when the battery is installed.
Sufficient battery power is indicated by a periodic flash of the LED
visual alarm (about every 10 s). When the alarm is activated, more
power is needed. Insufficient battery power is indicated by a short
audible tone emitted about every 10 s; the battery should be replaced
at the end of any sampling period if the low battery warning is
activated. The industrial hygienist should be notified if this occurs.
4.2.a. Functional use - ALWAYS OBTAIN A PRINTOUT OF ANY USABLE STORED DATA PRIOR TO INSTALLING THE BLUE KEY.
Installation of the blue key puts the Datalogger into "Sleep-mode," turns off the display, and reduces power consumption.
To start the Logger-mode and reset (clear) the memory, align the blue key, insert it into the Datalogger, turn the knurled ring until it is tight, and then remove the key. This starts the datalogging. When doing this, data stored previously in the memory will be lost.
During data collection, the display will show consecutively: (1) the immediate concentration (displayed for 5 s), (2) a "running" TWA (displayed for 2.5 s), (3) the peak concentration recorded during the time period sampled (displayed for 2.5 s). The Datalogger stops sampling after 12 h and the display shows OFF. To terminate the logging function at any time, attach the red key and depress the button once. The display will then show a continuous monitoring of the immediate concentration of the environment [as discussed in (1) above]. Do not depress the red key again before transferring the data or the data may be lost.
5.a. Data Recovery
- 5.1.a. Precautions
DO NOT INSTALL THE BLUE KEY PRIOR TO DATA TRANSFER, or the stored data will be lost.
DO NOT TRANSFER DATA IN POTENTIALLY HAZARDOUS ENVIRONMENTS where a spark might cause an explosion.
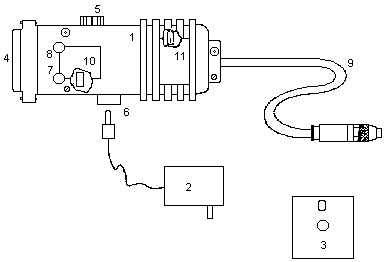
| 1. | Converter Box |
| 2. | 9V AC/DC Adaptor |
| 3. | Floppy disc - Enhanced Graphic Software |
| 4. | RS232 Interface Connector (female) |
| 5. | ON/OFF Switch (SW1) for starting transmission |
| 6. | AC/DC Supply Connector |
| 7. | "Power On" LED (green) |
| 8. | "Transmit" LED (red) |
| 9. | Interface cable to Model 190 Datalogger |
| 10. | Switch 2 (SW2) Selection Data Receive Line |
| 11. | Switch 3 (SW3) Connection DTR to ground |
- 5.2.a. Computer equipment setup
- 5.2.1.a. Connect the RS232 connector of the Converter Box to the
RS232 port of the computer (Figure 10).
Use a suitable extension cable or adapter if needed.
5.2.2.a. Connect the AC/DC Adapter to the Converter Box and the power outlet, making sure the switch (SW1) on the side of the Converter Box is in the OFF position.
5.3.a. Programming of the computer
- 5.3.1.a. Load the MS-DOS system into the computer memory.
5.3.2.a. Load the Draeger EGS software into the computer (type EGS, press Enter).
5.3.3.a. When the Draeger logo appears on the screen, press any key. The following menu will appear:
| Commands: | |
| 0 = List files | 1 = Quit |
| 2 = Retrieve file | 3 = Load from Logger |
| 4 = Save file | 5 = Display graph |
| 6 = Print Report | 7 = Configuration |
| Type Command -> | |
5.4.a. Data transfer
- 5.4.1.a. Connect the Converter Box cable to the Datalogger.
5.4.2.a. Press 3 (after Type Command ->) on the computer. This will set it up to receive data from the Datalogger.
5.4.3.a. Switch SW1 on the Converter Box to ON. The green LED will be lit. Data transmission will start automatically and the red LED will be lit. After a few moments, data transmission will be complete and the red LED will extinguish. At this point, switch SW1 to OFF. The data stored in the Datalogger will remain intact.
5.4.4.a. Default text information (from any previous data entry) will now appear on the screen. New text information can be added at this point:
| Name | of user or operator |
| Location | where measured or headquarters |
| Date | when logged or downloaded |
| Start Time | when logging was started (military time format) |
| Comment | regarding this record |
| Gas | (select number from list) |
| Serial Number | of instrument used |
5.4.5.a. Disconnect the Datalogger from the Converter Box. The data are now stored in the computer. The Datalogger should still have the data retained.
5.4.6.a. Screw the cap on the Datalogger key connection terminal. If data retention is no longer necessary and the monitor is to be stored, insert the blue key. This will reduce battery power consumption.
5.5.a. Other DATALOGGER ANALYZING SYSTEM commands
| Note: | Check the configuration of the system before data transfer (press 7) to assure data will be deposited to the appropriate disk or area in the computer. |
- 5.5.1.a. Save file: Press 4 and then enter a file
name (up to eight characters). Do not supply the ".DAT"
extension; this is added by the software. The data will be stored in
the computer.
5.5.2.a. Commands used to retrieve data:
List files: Press 0 to obtain a list of other Datalogger files in storage.
Retrieve file: Press 2 to retrieve another set of data from storage and store it in the computer memory.
Display graph: Press 5 to display the graph of CO concentration versus time. When the computer-printer system has been set up, follow the instructions to print a copy of the graph. To obtain a vertical printout, press F7. To obtain a horizontal printout, press F8. To return to the menu, press Enter.
Print report: When a printer system is installed, press 6 to print a copy (spread sheet) of the complete list of the data from the Datalogger.
5.5.3.a. Quit: When data handling operations are complete, press 1 to exit from the EGS program.
The following gas blends containing CO are available for the OSHA offices. Orders may be placed through the regional offices, as for other supplies (5.24.):
| BLEND #2 - | Mixture of 35 ppm Carbon Monoxide, 1.6% Methane, 19.5% Oxygen and balance Nitrogen. The actual concentration of the Carbon Monoxide may vary between 35-40 ppm, the Methane between 1.5 -1.7%, and the Oxygen between 19.5% to 19.0%. |
| BLEND #3 - | 70 ppm ±5 ppm Carbon Monoxide in Air. |
| BLEND #5 - | Mixture of 50 ppm Carbon Monoxide, 0.55% ±.05% n-Hexane (50% of Lower Flammable Limit), 19.5% -.2% +0% Oxygen and the balance Nitrogen. [Note: Due to oxygen meter alarm characteristics, the oxygen range for this blend may not exceed 19.5% (+0%) and may not be lower than 19.3% (-0.2%).] |
Examples of the labels which may appear on the BLEND #2 gas cylinders are shown below:
THIS CYLINDER CONTAINS THE NECESSARY CONCENTRATION OF THE LISTED GASES TO SPAN OR CHECK THE ALARM OPERATION OF THE FOLLOWING INSTRUMENTS:
DRAEGER MODEL 190 CO DOSIMETER
MSA MICROGARD PORTABLE ALARM
SCOTT-ALERT MODEL S105
ISC CMX270, 271 & MX241 MONITORSTHE INSTRUMENT MUST SEE THE CORRECT FLOW OR ERRORS IN READING THE GAS CONCENTRATIONS CAN OCCUR. USE THE APPROPRIATE REGULATOR THAT SUPPLIES EACH INSTRUMENT THE PROPER FLOW AS LISTED BELOW:
DRAEGER MODEL 190 200 sccm MSA MICROGARD 200--250 sccm SCOTT-ALERT MODEL S105 750--1000 sccm ISC CMX & MX MONITORS 500--750 sccm To re-order this cylinder thru the OSHA Cincinnati Laboratory, contact the ARA for Technical Support in your region. Order: BLEND #2.
(Note: sccm = standard cubic centimeters per minute)
| Approximate pressure | 1000 psig |
| Approximate volume | 100 liters @ 70°F |
| ANALYSIS | |
| COMPRESSED GAS N.O.S. | UN1956 |
| CARBON MONOXIDE | 35.3 PPM |
| METHANE | 1.59% |
| OXYGEN | 19.5% |
| NITROGEN | BALANCE |
| Date shipped | 10/16/91 |
|
[50% RH and 20-25°C]
| |||||||||||||||||||||||||||||||||||||||||||||||||||||||||||||||||||||||||||||||||||||||||||||||||||||||||||||||||||||||||
|
[50% RH and 20-25°C]
| |||||||||||||||||||||||||||||||||||||||||||||||||||||||||||||||||||||||||||||||||||||||||||||||||||||||||||||||||||||||||||||||||
|
[50% RH and 20-25°C, Low Concn]
| ||||||||||||||||||||||||||||||||||||||||||||||||||||||||||||||||||||||||||||||||||||||||||||||||
|
[50% RH and 20-25°C, Low Concn]
| |||||||||||||||||||||||||||||||||||||||||||||||||||||||||||||||||||||||||||||||||||||
|
[50% RH and 20-25°C, Ceiling Concn]
| |||||||||||||||||||||||||||||||||||||||||||||||||||||||||||||||||||||||||||||
|
[30% RH and 20-25°C]
| ||||||||||||||||||||||||||||||||||||||||||||||||||||||||||||||||||||||||||||||||||||||||||||||||||||||||
|
[30% RH and 20-25°C]
| ||||||||||||||||||||||||||||||||||||||||||||||||||||||||||||||||||||||||||||||||||||||||||||||||||||||||
|
[80% RH and 20-25°C]
| |||||||||||||||||||||||||||||||||||||||||||||||||||||||||||||||||||||||||||||||||||||||||||||||||||||||||||||||||||||||||||||||||||
|
[80% RH and 20-25°C]
| |||||||||||||||||||||||||||||||||||||||||||||||||||||||||||||||||||||||||||||||||||||||||||||||||||||||||||||||||||||||||||||||||||
|
| ||||||||||||||||||||||||||||||||||||
|
(Truncated TWA Output Values)
| ||||||||||||||||||||||||||||||||||||||||||||||||||||||||||||||||||||||||||||||||
|
(Hand-Calculated Average Values)
| ||||||||||||||||||||||||||||
